Ledger — User Manual
A trade journaling and analytics tool for live, prop-firm and paper accounts. Import your trade history from a broker, record the context around each trade, and review the results.
Disclaimer. This application is a trade journaling and analytics tool designed to help users organize and review their trading activity. It does not provide financial advice, trading recommendations, or guarantees of future results. Analytics are based on user-provided data and should be interpreted accordingly.
About the screenshots. All screenshots in this manual are for illustrative purposes only. They were created using a demo account with fictional names, trades, and account data. They do not represent any real customer, account, or trading activity.
PDF version: Ledger-User-Manual.pdf — every image embedded, nothing external to fetch.
Quick start
About ten minutes, start to finish.
| # | Step | Where |
|---|---|---|
| 1 | Create an account and enter the emailed 6-digit code | Start free on the home page, or /signup |
| 2 | Add a trading account — name it and set the type (live, prop or paper) | Settings → Accounts |
| 3 | Import your history, or add one trade by hand | Journal → Import CSV / + Add trade |
| 4 | Work the Needs review tab: attach a playbook, tag it, record any mistakes and the context | Journal |
| 5 | Compare the results you have recorded | Analytics |
Steps 1–3 get data in. Steps 4–5 are the part that repays repeating: the fields you record in step 4 are the ones available to compare in step 5.
Contents
- Getting started
- Trading accounts
- Adding trades
- The dashboard
- The journal
- Calendar
- Analytics
- Goals
- Journal library
- Settings
- Plan and billing
- Support
- Exporting your trades
- Frequently asked questions
1. Getting started
Sign up
- Select Start free on the home page, or go directly to
demoerp.info/signup. Enter your email, name and a password (8 characters minimum). - We email you a 6-digit code. Enter it to verify.
- You're in.
Your 24-hour trial starts when you verify, not when you sign up. If you register at midnight and check your email at 8am, you still get a full 24 hours.
No card is required to trial.
The trial
Every new account gets 24 hours of access to the full feature set: every broker importer, and no cap on accounts or trades.
A banner across the top counts down the time remaining. With more than two hours left it appears in the accent colour; under two hours it switches to red.
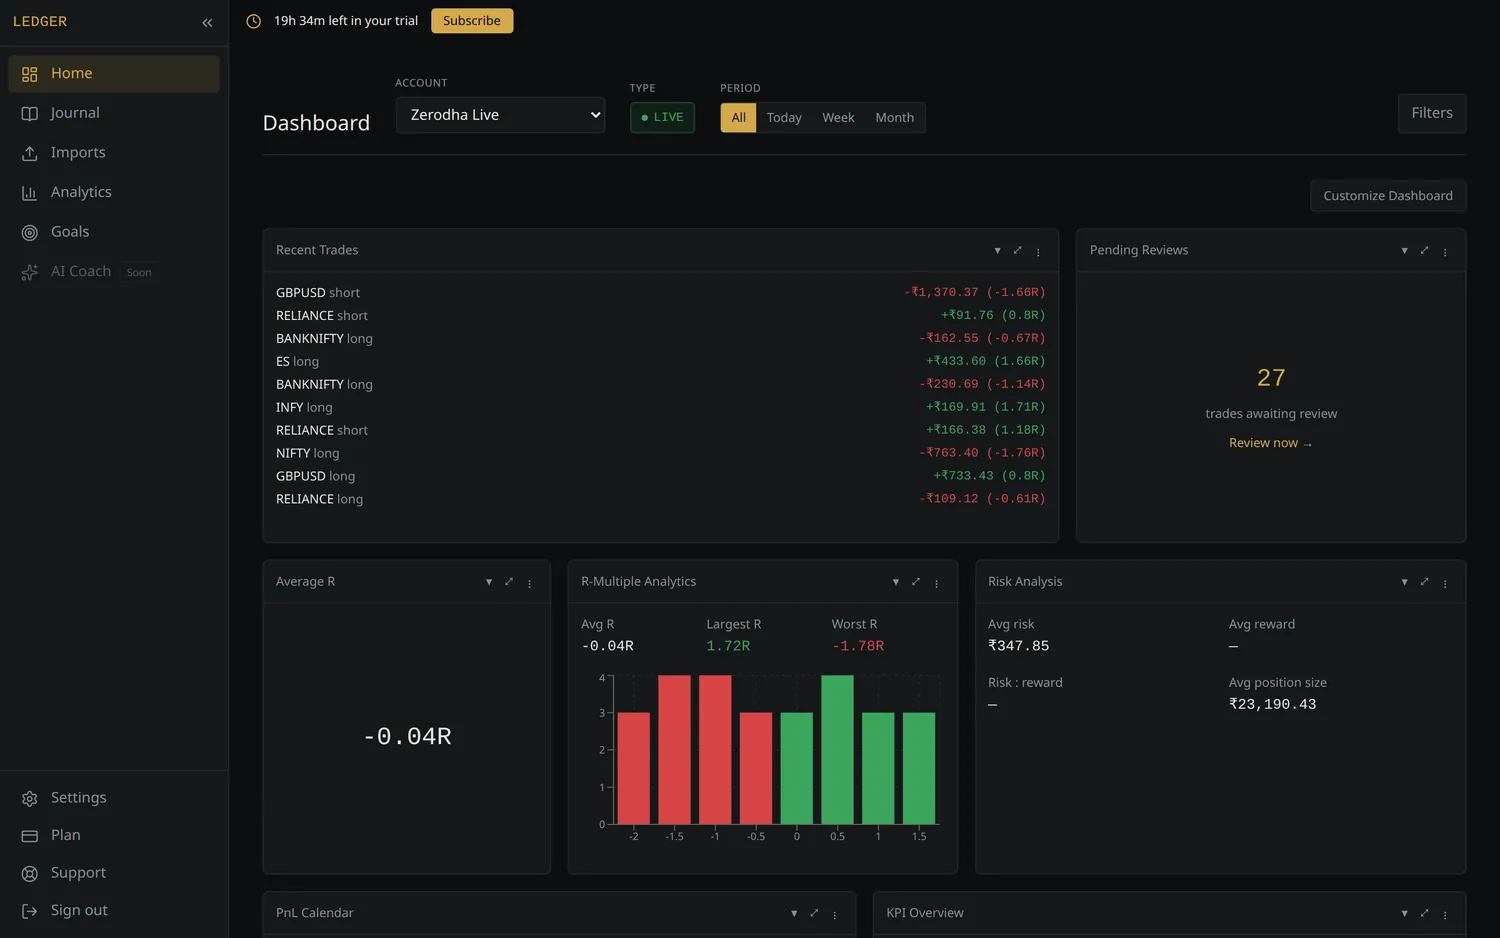
When the 24 hours are up, the app locks until you subscribe. Nothing you've recorded is deleted — it's waiting for you when you come back, and you can export it at any time, even after the trial ends.
2. Trading accounts
An account is one place you trade — a broker account, a prop-firm evaluation, or a simulator. Keeping them separate means one blown sim day doesn't pollute your live statistics.
Settings → Accounts → + Add account
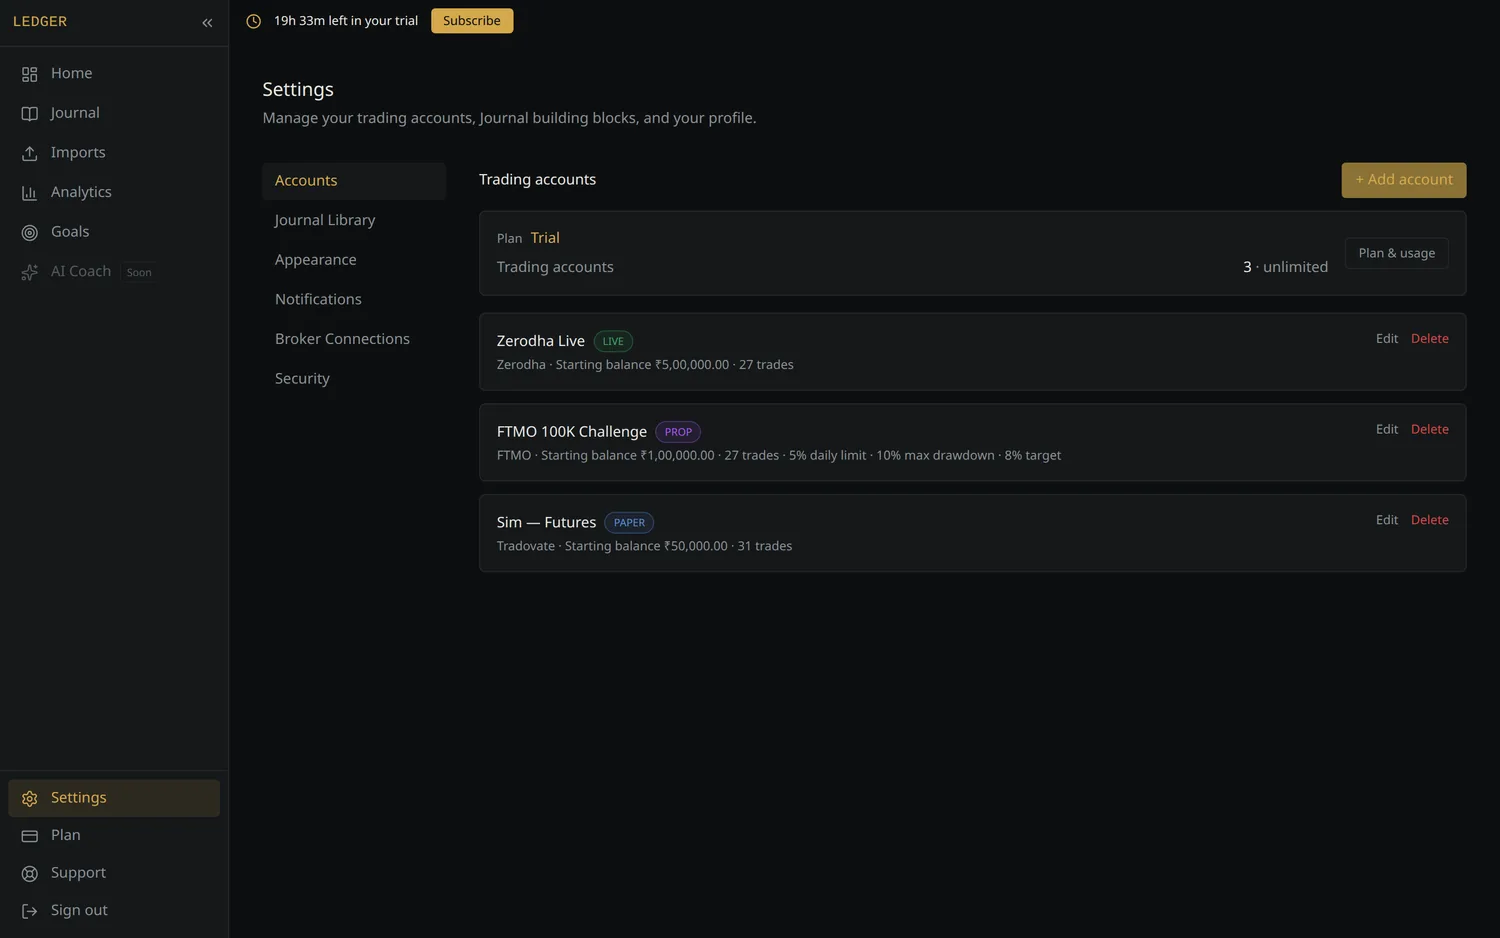
Three account types
| Type | Use it for | What changes |
|---|---|---|
| Live | Real money at a broker | P&L, R-multiples, risk widgets |
| Prop | FTMO-style evaluations | Adds drawdown limits, profit target, trading-day and consistency tracking |
| Paper | Simulators, backtesting | Same analysis, visually marked so you don't confuse it with live results |
Choosing Prop reveals extra fields: daily loss limit, max drawdown, profit target, minimum trading days and the consistency rule. Fill in whatever your firm requires and the dashboard tracks you against it.
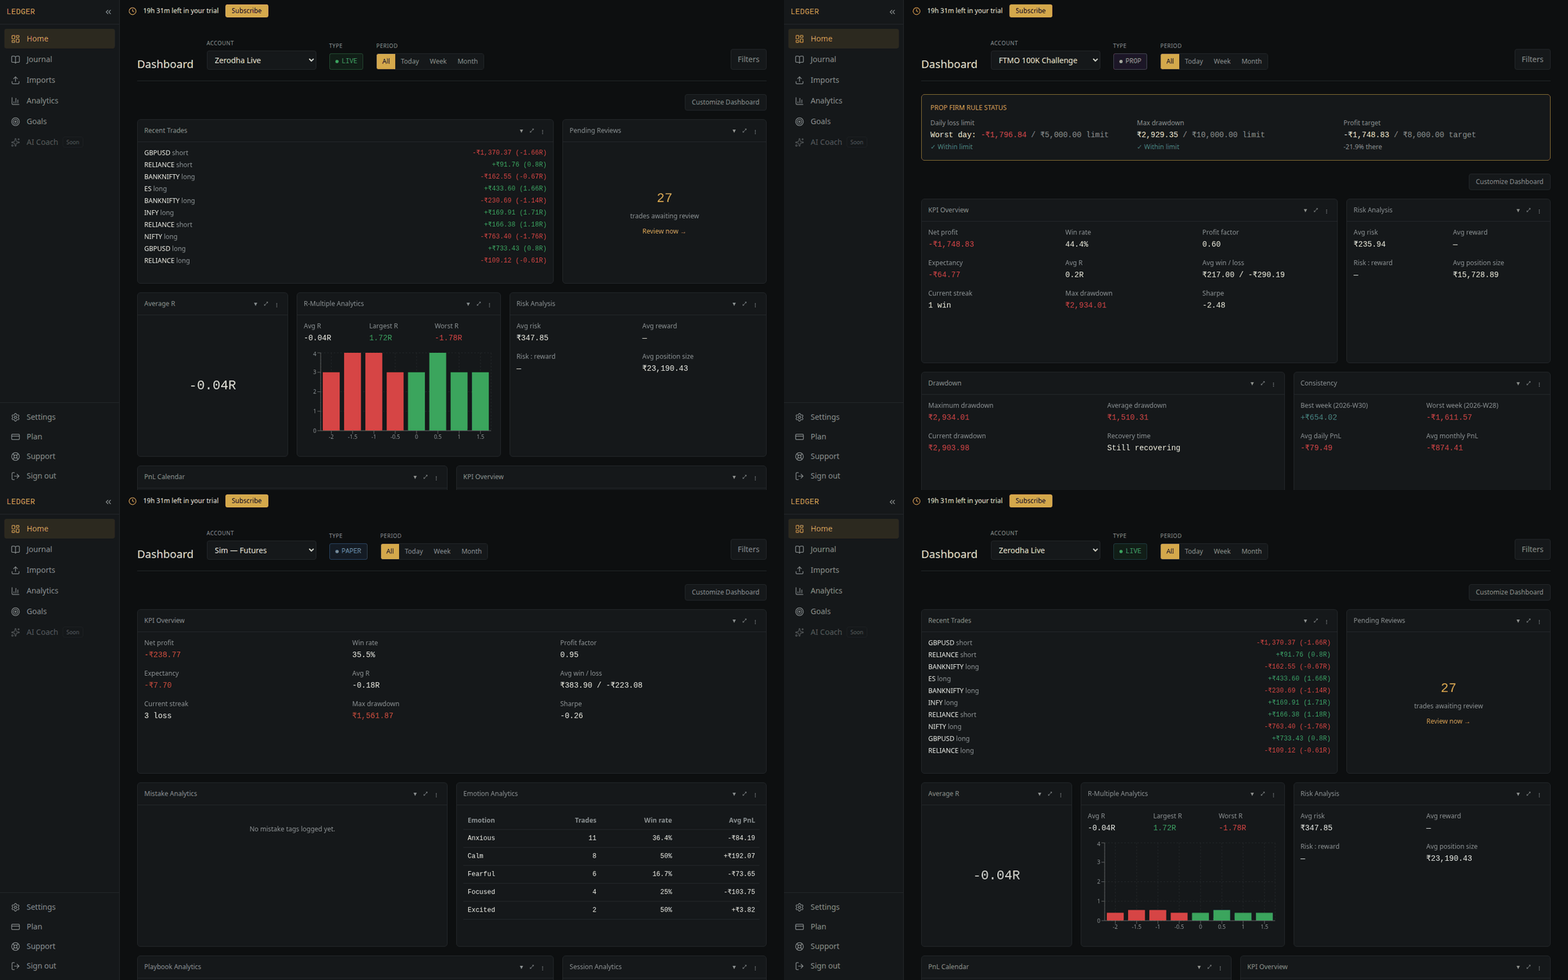
The dashboard adapts to the type
Switching accounts rebuilds the dashboard around what matters for that type prop accounts get rule tracking, paper accounts don't get risk-of-ruin warnings:
3. Adding trades
Three ways in. Most people import, then edit.
By hand
Journal → + Add trade
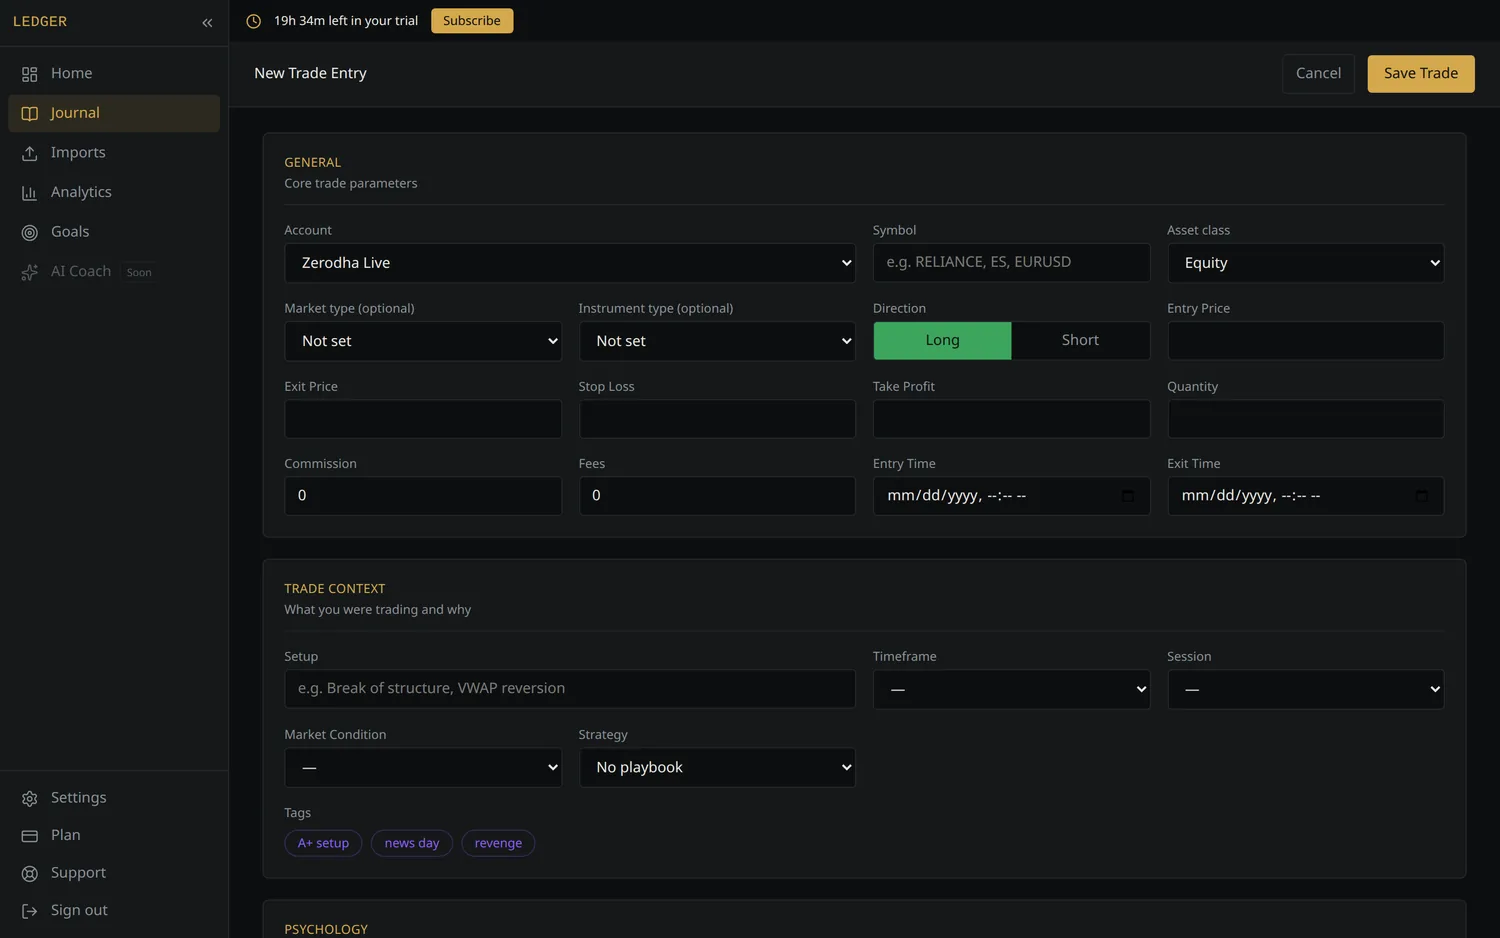
Only five fields are required — symbol, side, entry price, quantity, entry time. Everything else (exit, stop, target, playbook, tags, notes, and the psychology fields) can be filled in later during review.
Setting a stop loss is what lets us compute R-multiples. Without it you get P&L but no R, and R is the more useful number.
By CSV import
Journal → Import CSV
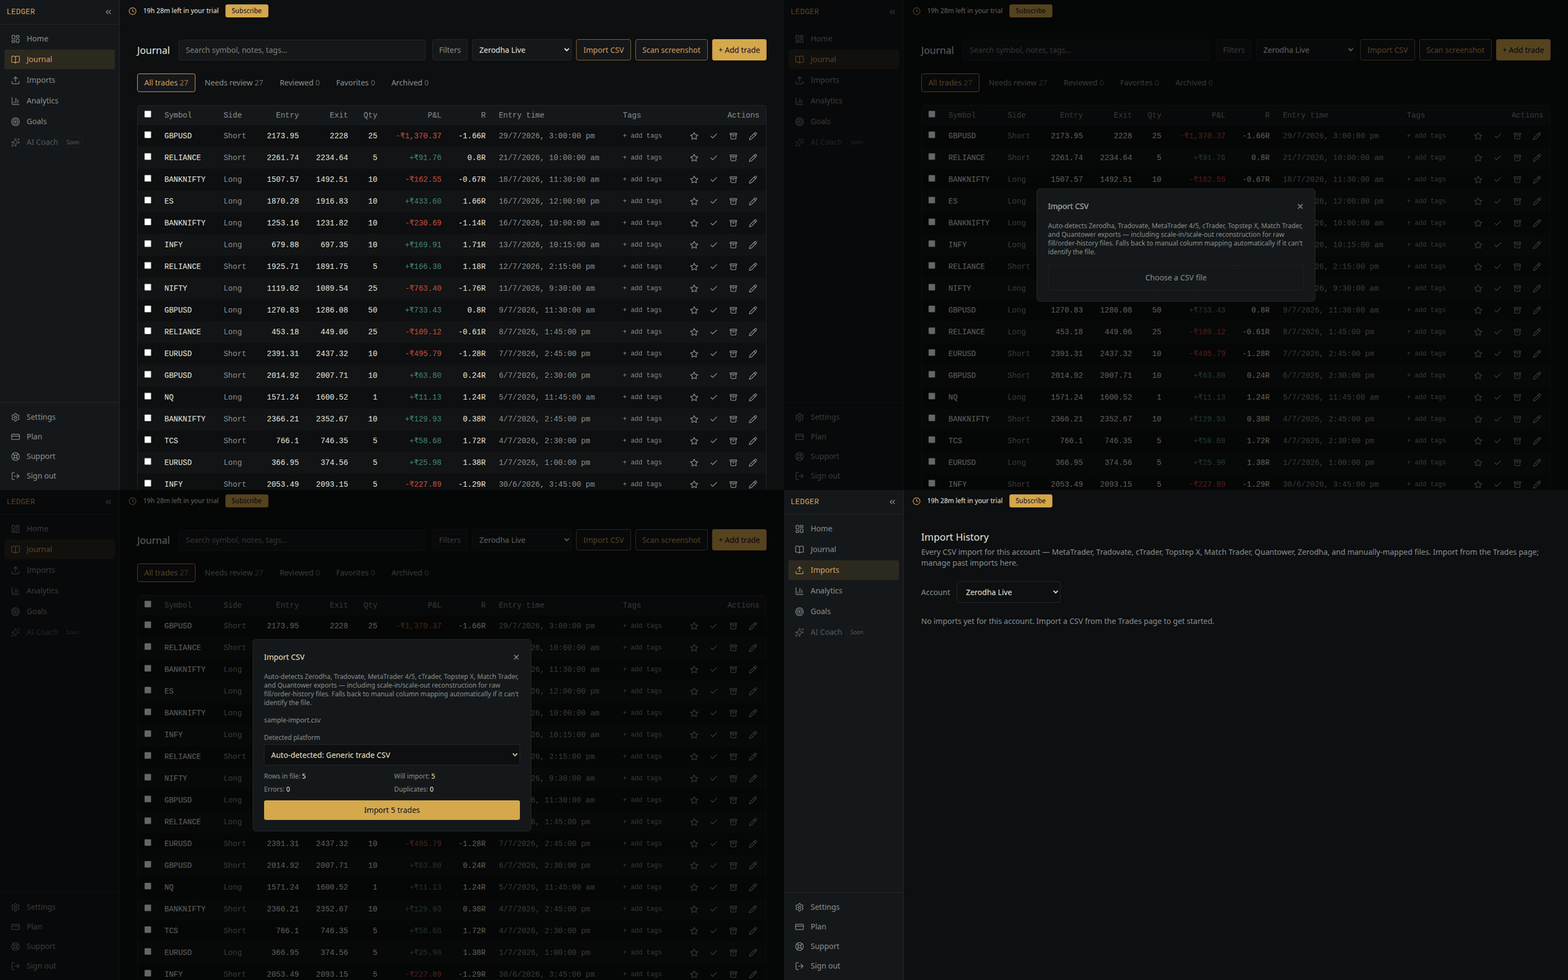
Drop the file in. We auto-detect the format, show you what will happen, and only write anything once you confirm:
- Zerodha — Console Tradebook
- Tradovate — Trades and order exports
- MetaTrader 4 / 5 — closed transactions, positions, and raw deals
- cTrader, Topstep X, Match Trader, Quantower
- Generic CSV — any file with symbol, side, entry price, quantity, entry time
Raw fill or order-history files are reconstructed into round-trip trades, including scale-ins and scale-outs.
If the format isn't recognised, you go straight to manual column mapping, where you point each of the application's fields at one of the columns in your file. You can save the mapping so the next file from that broker takes one step.
Renaming a column in your export does not create a new field. The importer maps your columns onto a fixed set of fields, and a column it doesn't recognise is ignored rather than added. If a required field (symbol, side, entry price, quantity, entry time) can't be identified automatically, you are prompted to map it yourself.
Duplicates are detected in two directions: against trades already recorded in the account, and against other rows in the same file. Matches are listed in the preview before anything is written, and importing them is a choice you make at the confirmation step rather than something that happens silently.
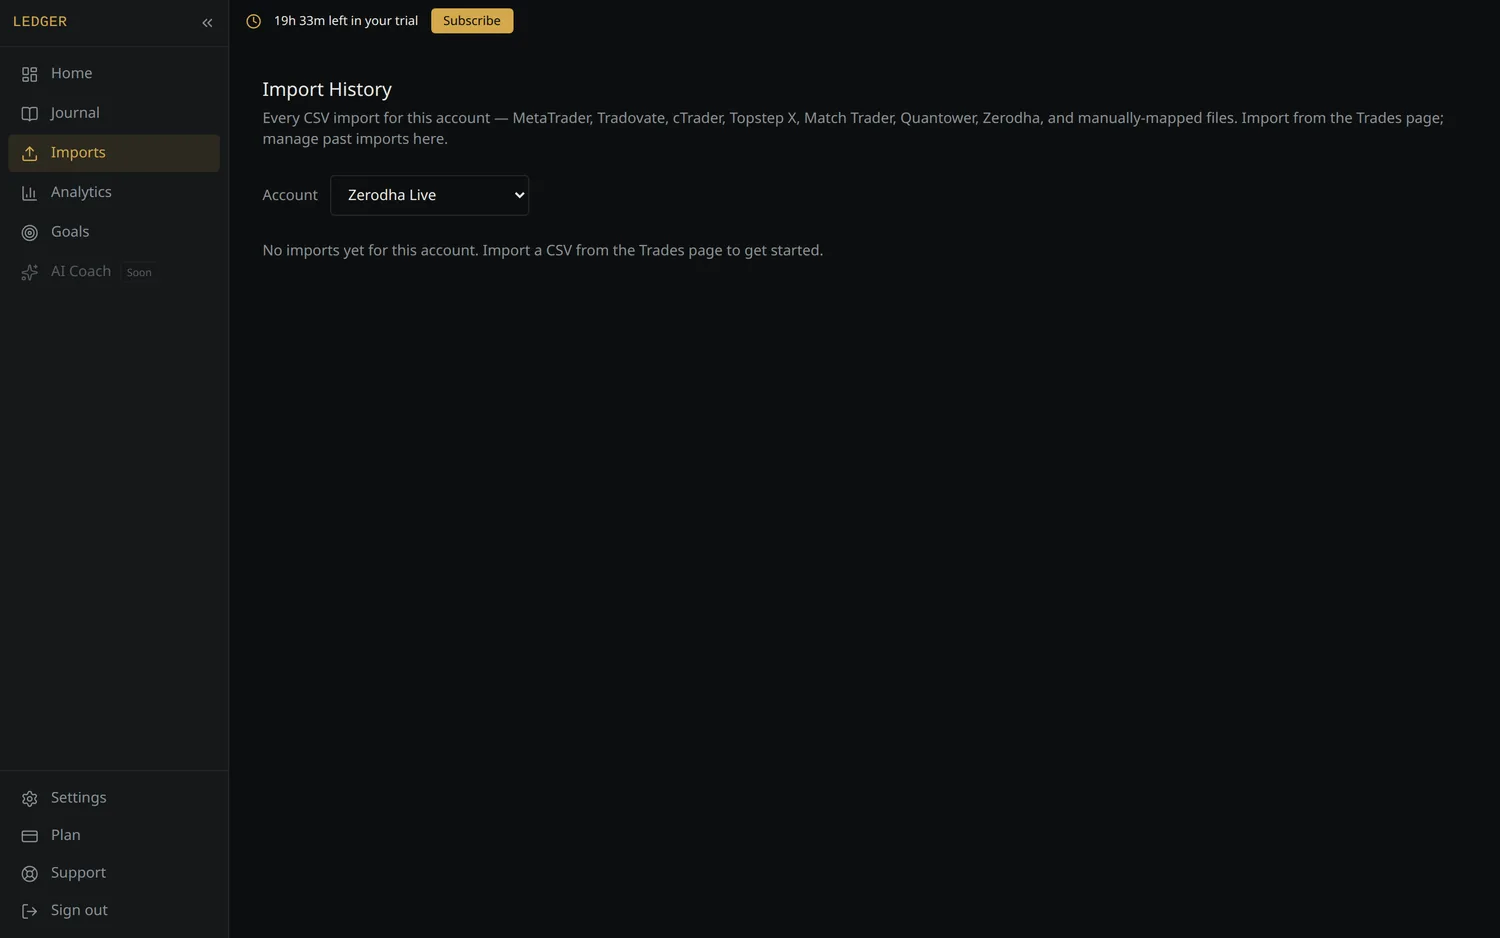
Every import is recorded under Imports, where you can review what was added, or delete a whole batch as a unit.
If you'd like us to consider adding support for your broker, please open a ticket from Support under the Imports category and attach a sample export. A few representative rows are usually sufficient, and you're welcome to remove or redact any information you prefer not to share. Many of the importers available today were developed in response to requests like these. We can't guarantee that every request results in a new importer, but a sample export helps us evaluate compatibility and prioritise future work.
By screenshot
Journal → Scan screenshot
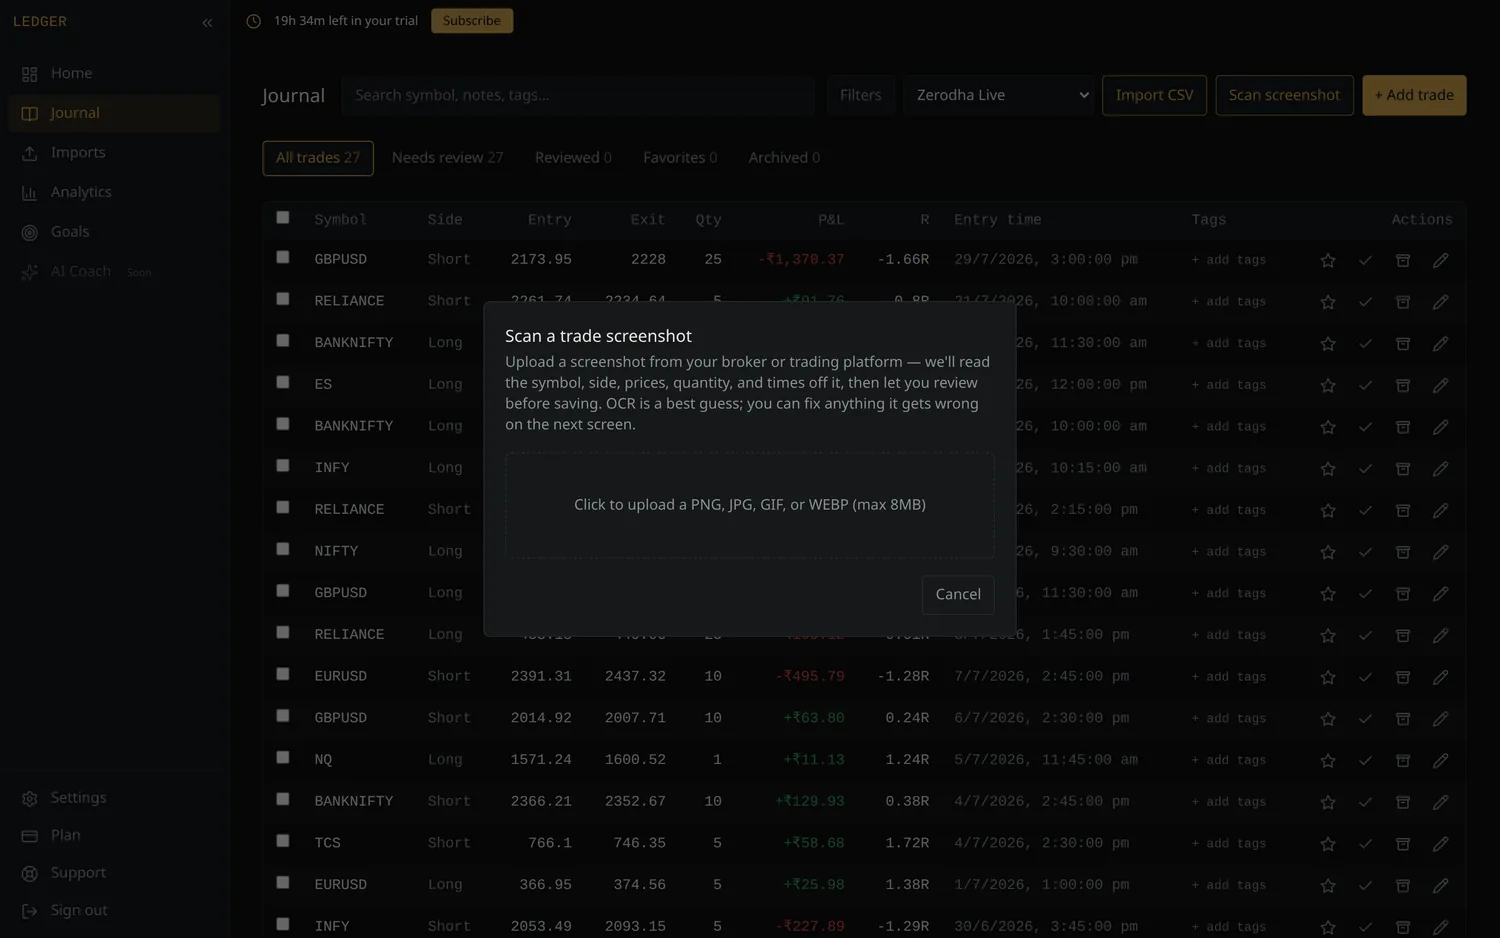
Paste or upload a screenshot of your order ticket, and OCR is used to extract the trade details. Before saving, review the extracted values to confirm they are accurate. OCR can occasionally misread text, particularly decimal points and visually similar characters, so a quick check is recommended.
4. The dashboard
Pick an account and a period (All / Today / Week / Month) at the top. Everything below responds.
Use Customize Dashboard to show, hide, resize and rearrange widgets. Dashboard layouts are saved separately for each account, so a prop account can be set up differently from a live one.
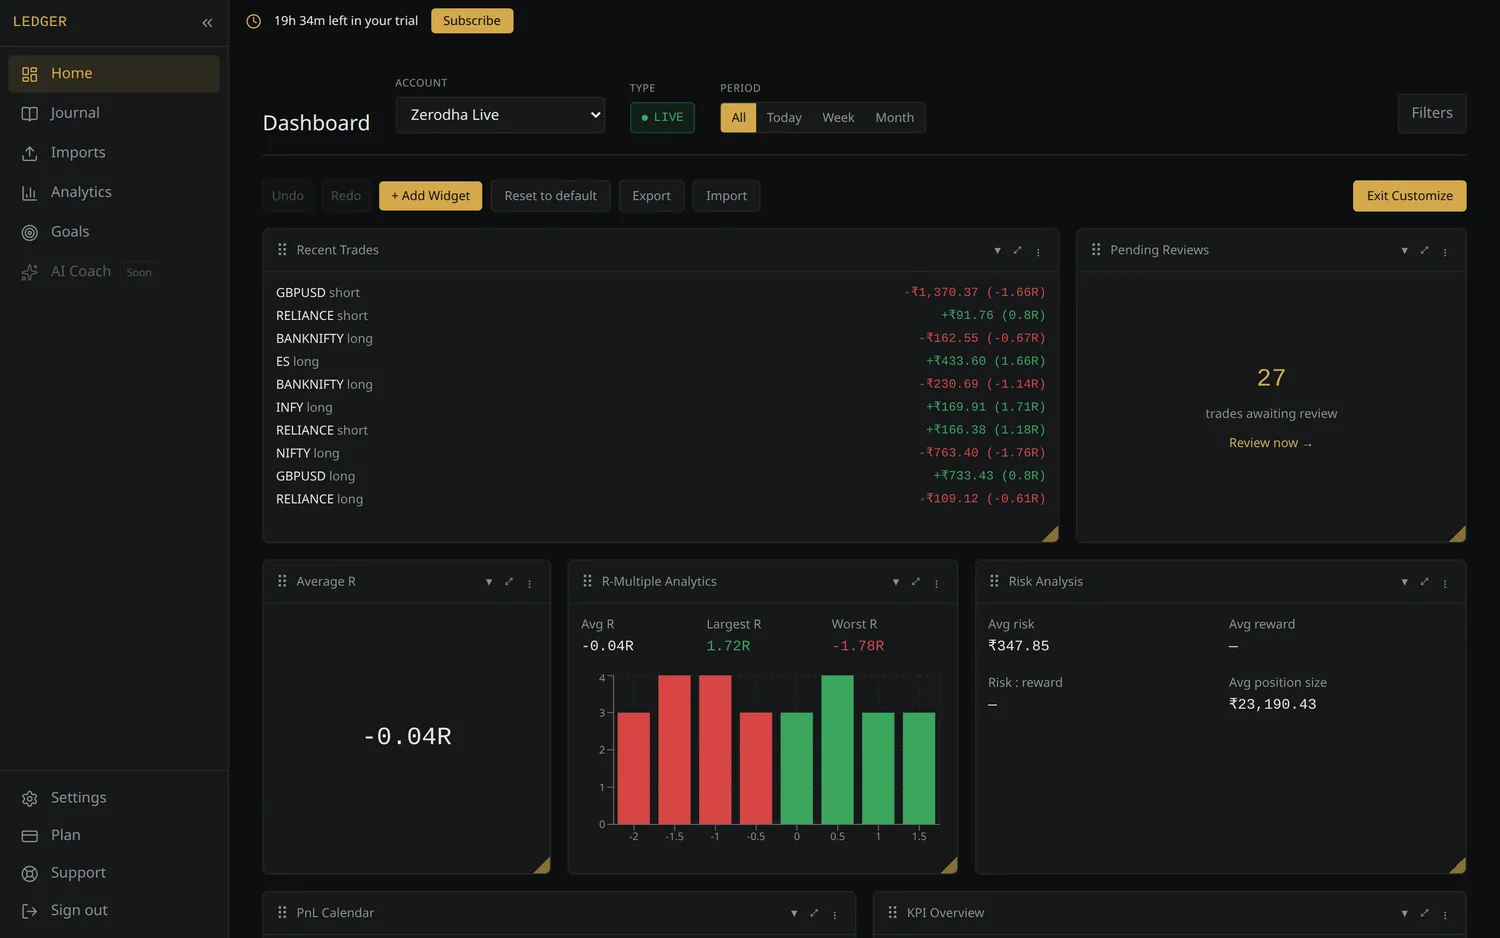
Widgets include recent trades, pending reviews, R-multiple distribution, risk analysis, a P&L calendar, KPIs, equity curve, and prop-firm rule tracking.
5. The journal
Every trade recorded in the selected account, filterable and sortable.
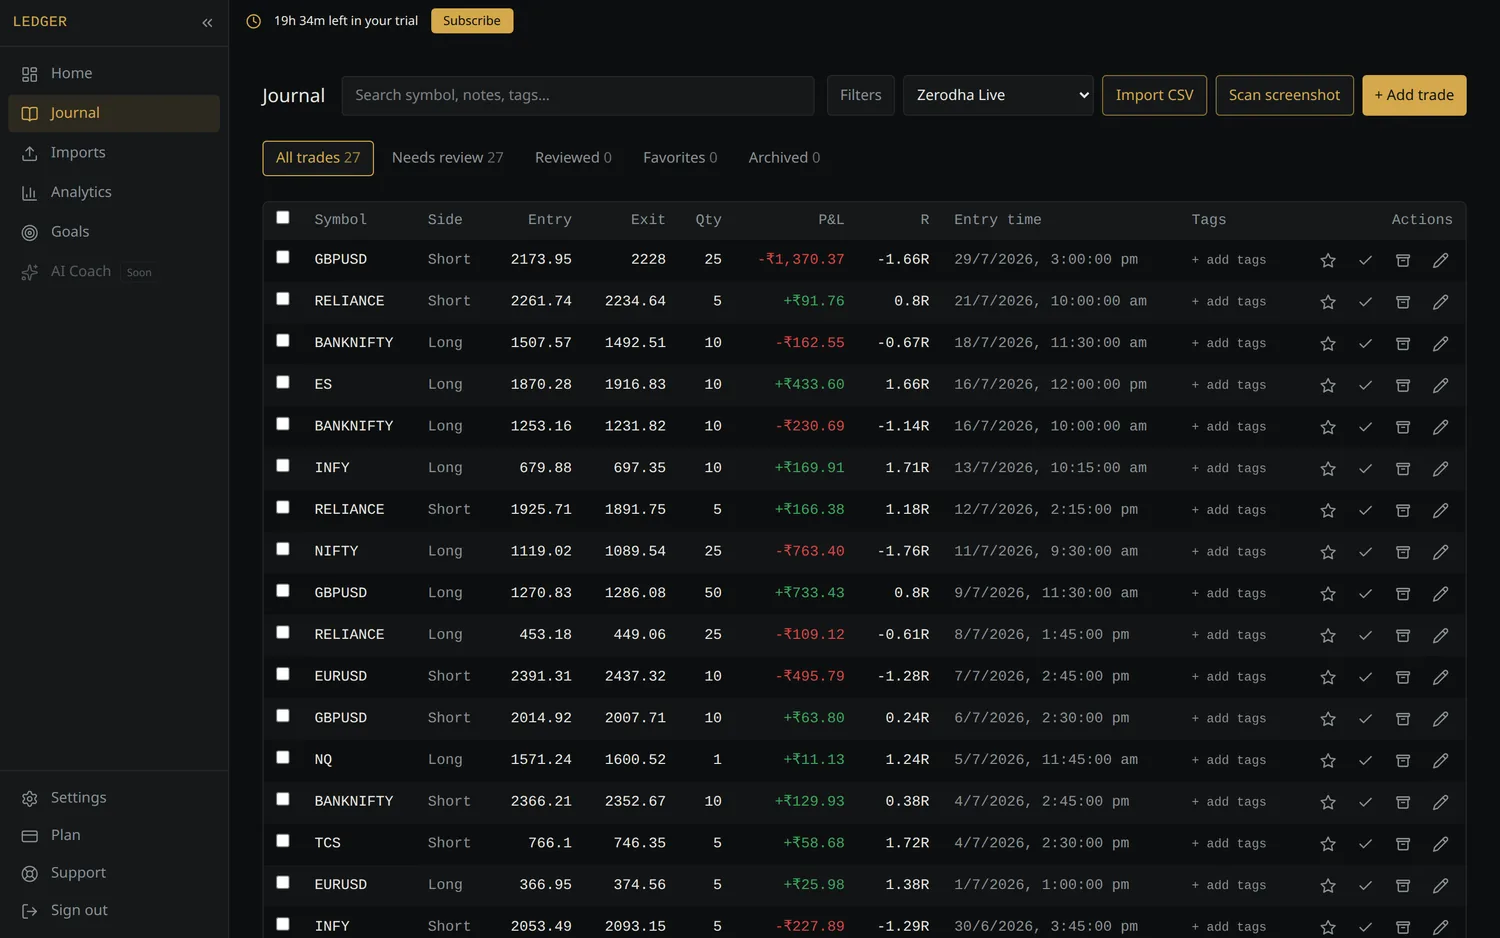
The review workflow
The tabs across the top are a workflow, not just filters:
- All trades — everything
- Needs review — imported or added but not yet examined. Work this down.
- Reviewed — you've looked at it and drawn a conclusion
- Favorites — trades worth revisiting
- Archived — hidden from the default view without being deleted
Filtering
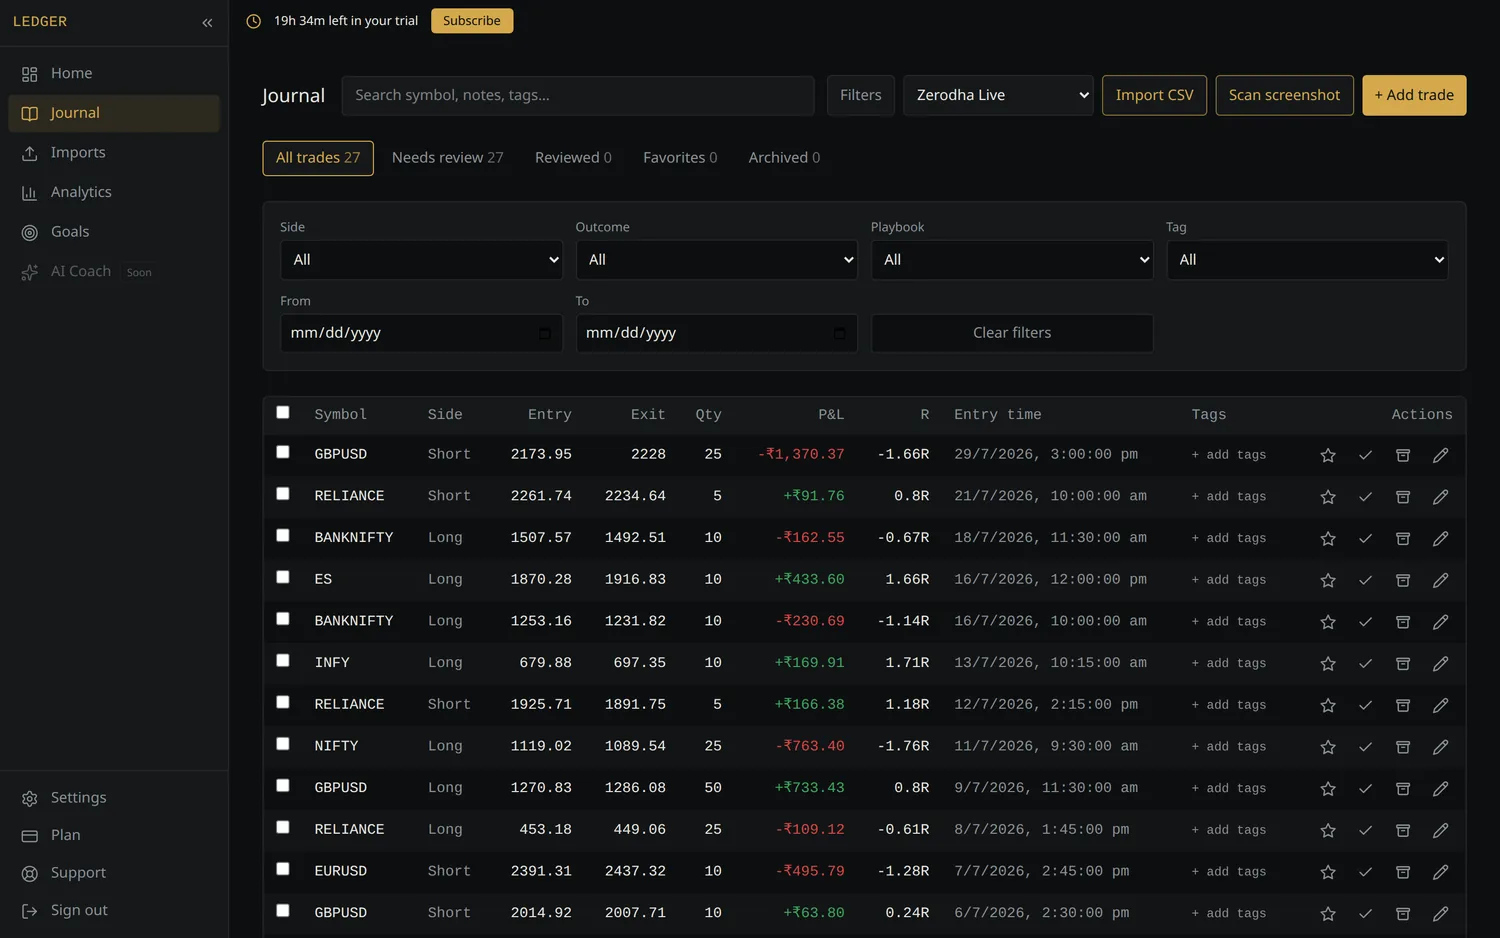
Search by symbol, notes or tags, or open Filters for side, playbook, tag, outcome and date range.
Trade detail
Click any symbol to open the full trade.
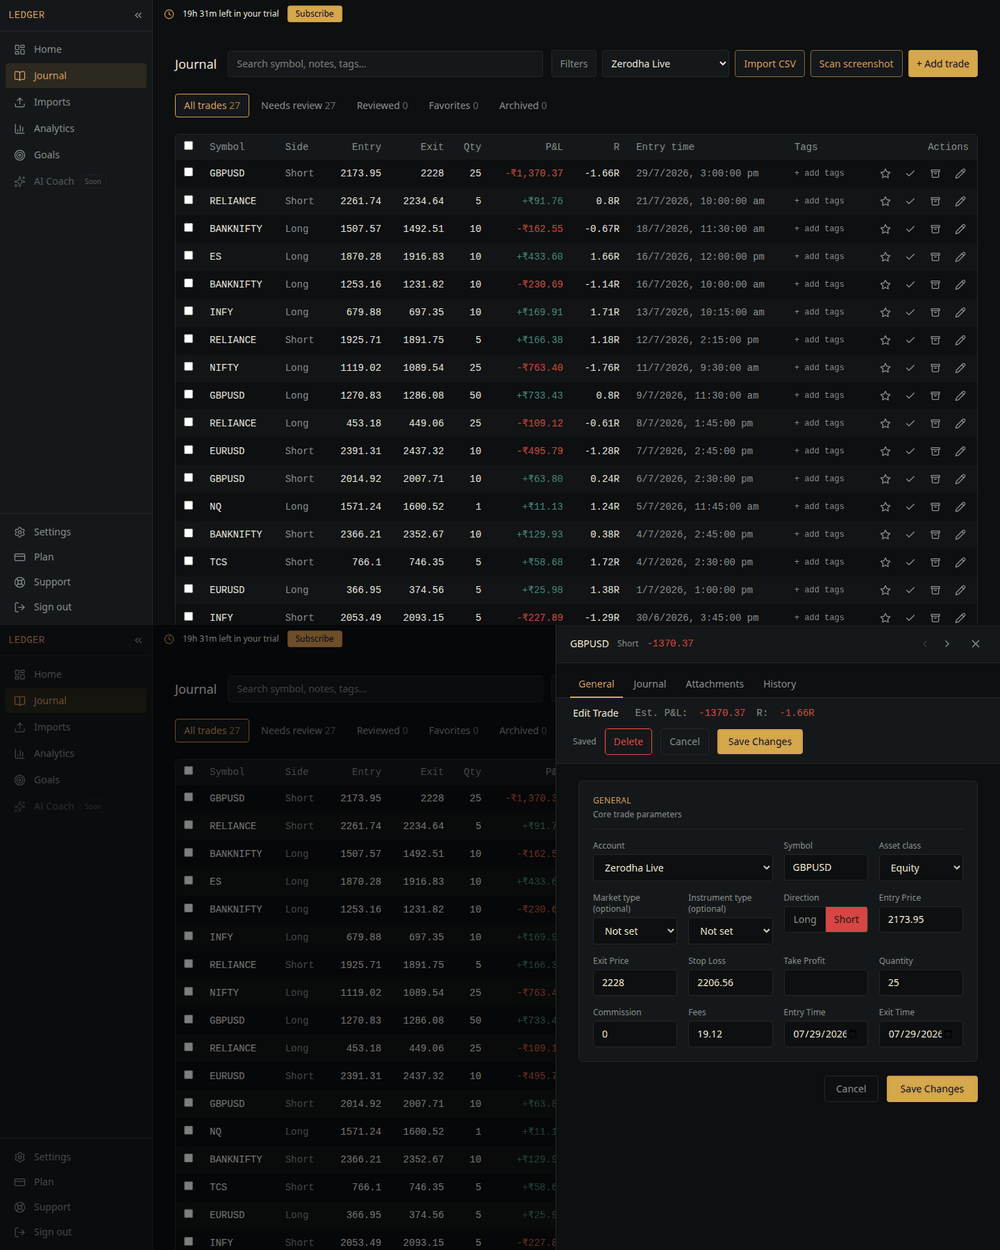
This is where the journal becomes more than a trade log. Attach a playbook, apply tags, record mistakes, and capture the context around each trade — confidence, stress, focus, emotion, and hours of sleep.
Over time this recorded context is what makes comparison possible. For example, you can compare results across trades you recorded as following fewer than six hours of sleep. Any such comparison reflects only the information you entered, and should be read as an analytical observation rather than as financial, trading, or professional advice.
Select multiple rows with the checkboxes to tag, classify or archive in bulk, which is useful straight after a large import.
6. Calendar
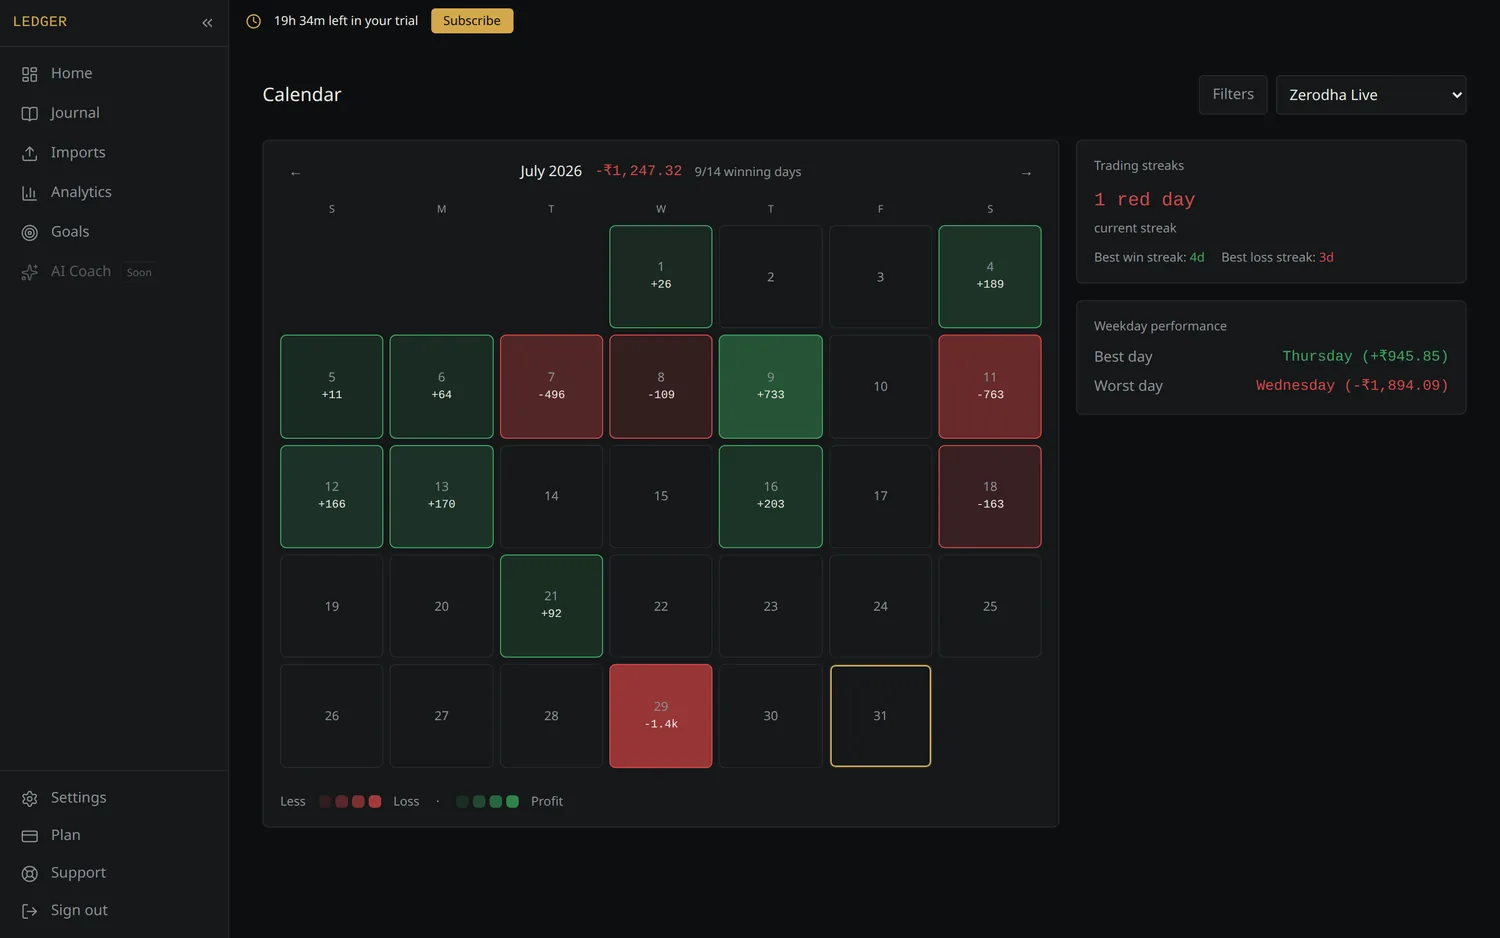
A month at a glance. Profitable days are shown in green and losing days in red, with deeper colours representing larger gains or losses.
Alongside the calendar — to the right on a desktop screen, below it on a narrow or mobile screen — you'll find summary statistics: your current winning or losing streak, your longest winning and losing streaks, and your best and worst-performing weekdays.
Click any day to view the trades recorded on that date.
7. Analytics
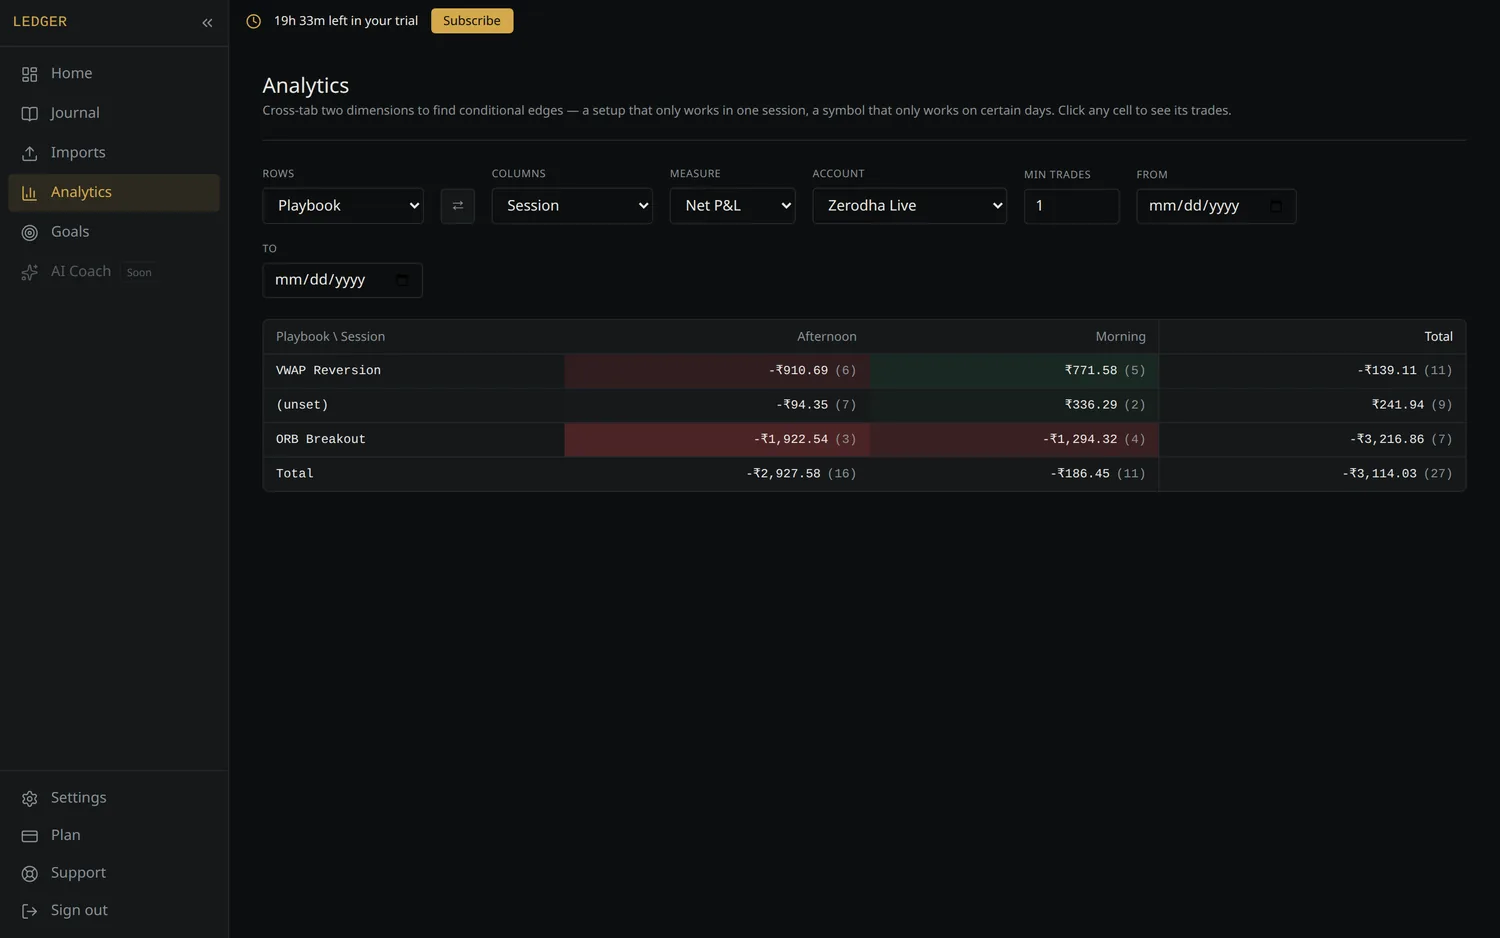
Use the cross-tab explorer to compare different aspects of the trade data you have recorded. Select one dimension for the rows, another for the columns, and choose a metric: net P&L, win rate, average R, trade count or profit factor.
Available dimensions include symbol, side, playbook, setup, timeframe, session, market condition, day of week, hour, trade duration, tags, mistakes, emotion, confidence, stress, focus, sleep and outcome.
A few combinations to start with:
- Playbook × Session — compare how a playbook's recorded results vary across trading sessions
- Emotion × Outcome — compare results across trades where you recorded different emotional states
- Symbol × Day of week — compare recorded results by symbol across days of the week
Use the Min trades filter to hide cells containing only a small number of trades, which reduces the chance of reading a pattern into very few results. Click any cell to view the trades included in it.
Analytics are based solely on the information recorded in your journal. They are intended to help you explore that data, and do not constitute financial or investment advice.
8. Goals
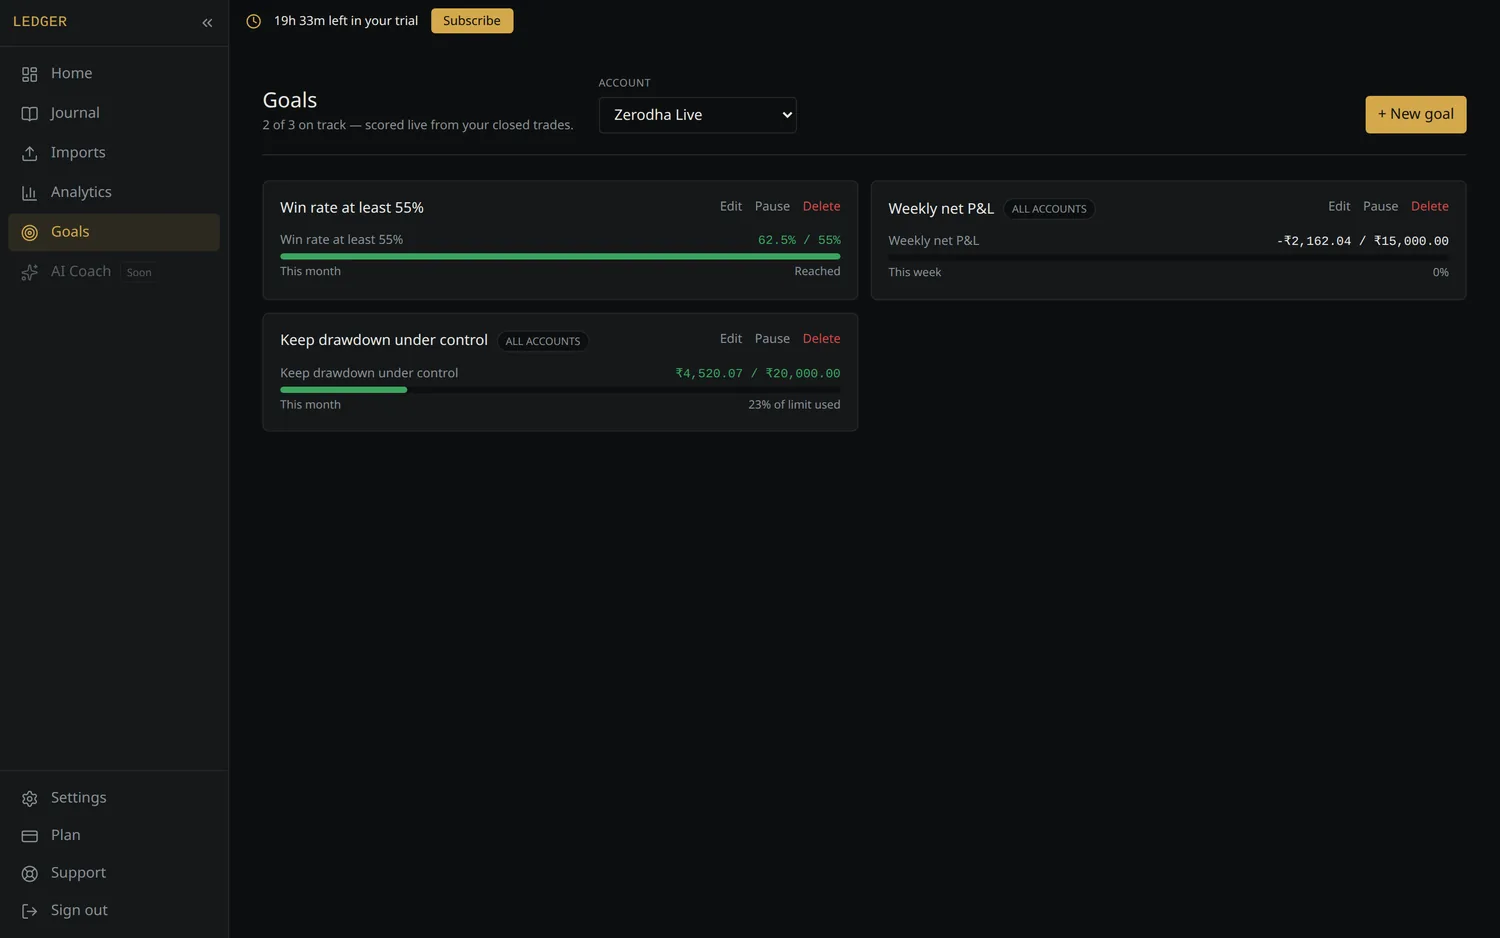
Set targets and have them scored automatically from your closed trades.
Pick a metric (net P&L, trade count, win rate, profit factor, average R, winning days, max drawdown), a direction (at least / at most), and a period (week, month, quarter, year, all time). Scope a goal to one account or across all of them.
At most goals — like a drawdown cap — display as allowance used, so 6% means you've used 6% of your limit, not that you're 6% of the way to failing.
9. Journal library
Settings → Journal Library
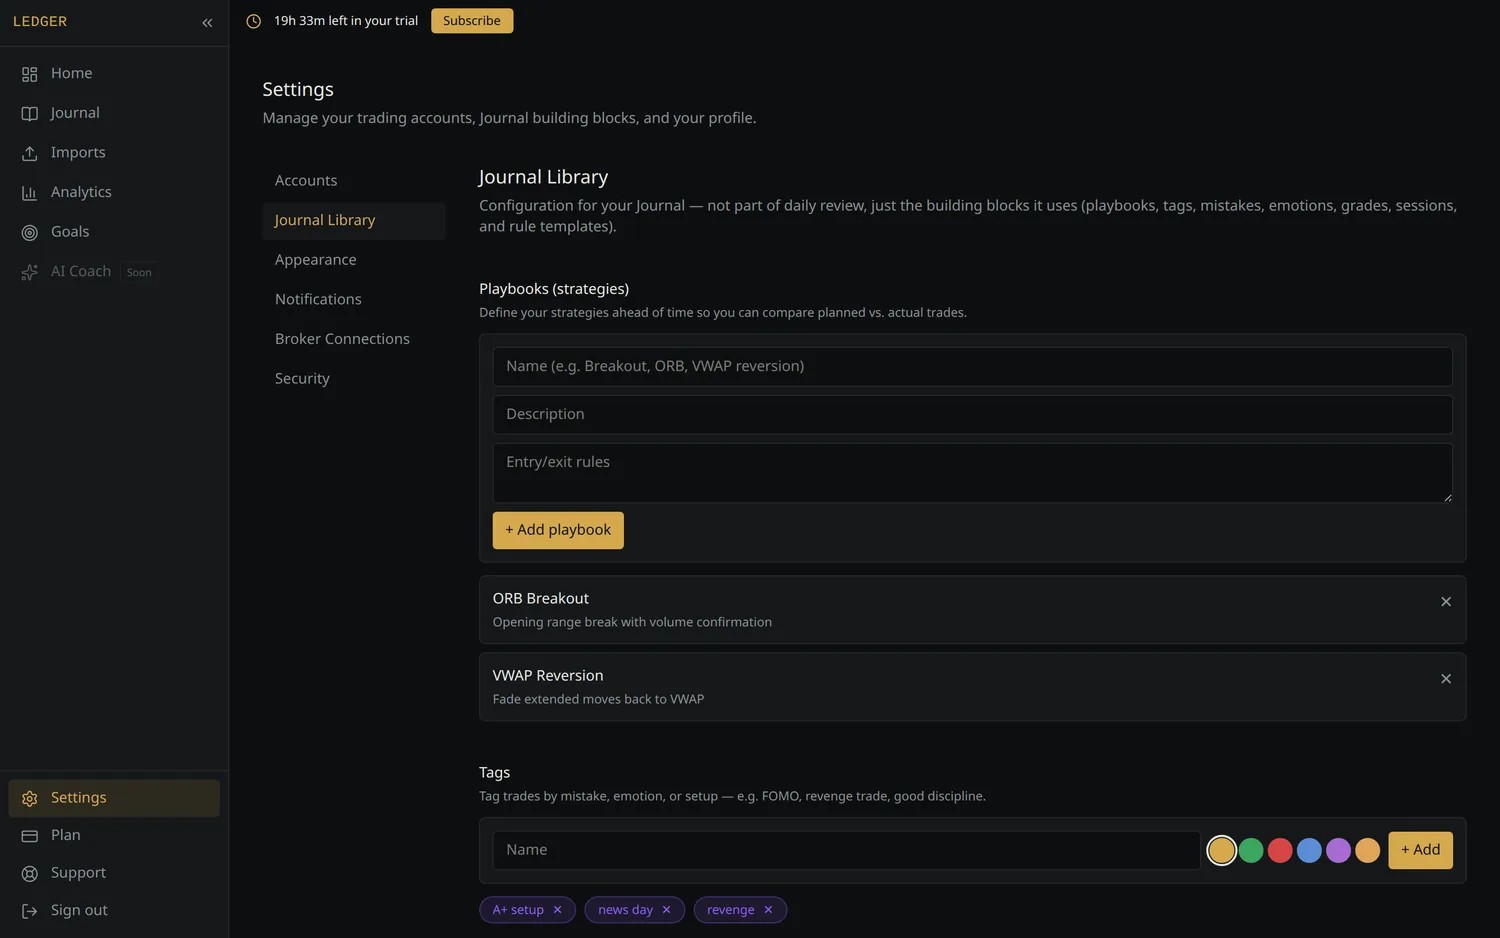
The building blocks the journal uses. Set them up once:
- Playbooks — define your strategies in advance, so the outcome you record can be viewed alongside the approach you intended
- Tags — flexible labels for organising trades (
A+ setup,news day,revenge trading) - Mistakes — a user-defined list of recurring mistakes to select from during review
- Emotions, trade grades, sessions, rule templates — additional context for categorising and reviewing trades consistently
Every item here is user-defined: the application records and organises what you select, and does not assess whether a trade was executed correctly or whether a plan was followed.
Defining mistakes in advance is what makes them countable later. Adding "Moved stop loss" as a selectable item allows it to be counted and compared across your journal; entering the same phrase only in a free-form notes field does not produce the same structured data.
10. Settings
| Tab | What's there |
|---|---|
| Accounts | Add, edit and delete trading accounts |
| Journal Library | Playbooks, tags, mistakes, grades, sessions, rules |
| Appearance | Display currency (₹, $, €, £, ¥, A$, C$, S$) |
| Notifications | Placeholder — not wired up yet |
| Broker Connections | Placeholder — imports are CSV for now |
| Security | Name, password, delete account |
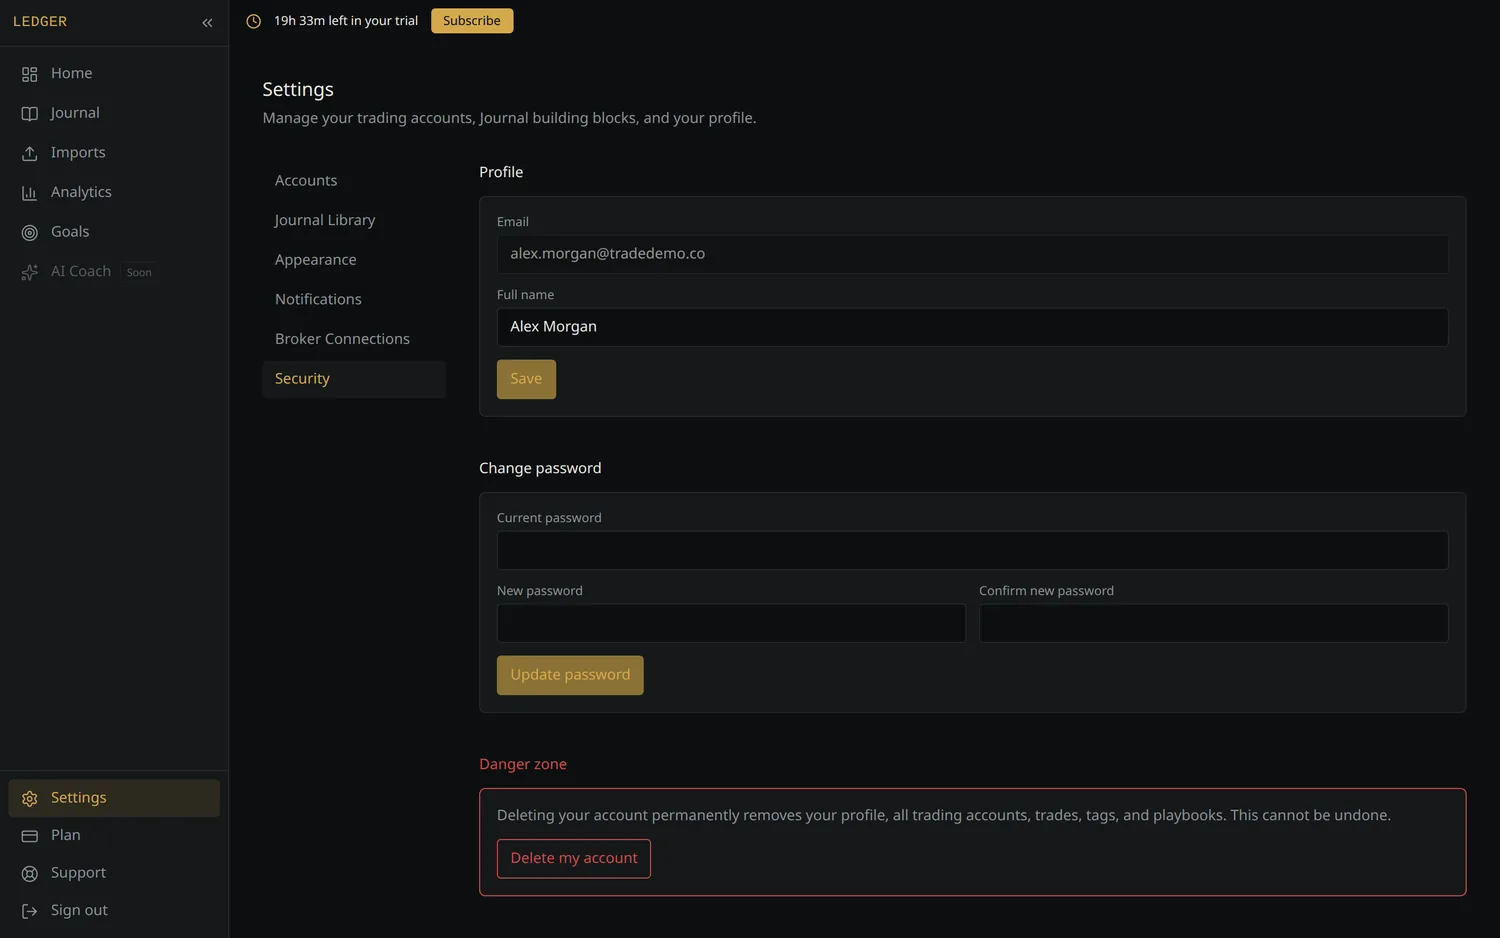
Deleting your account removes everything — accounts, trades, imports,
goals. It asks for your password and requires you to type DELETE. There's no
undo, so export first.
11. Plan and billing
Plan in the sidebar.
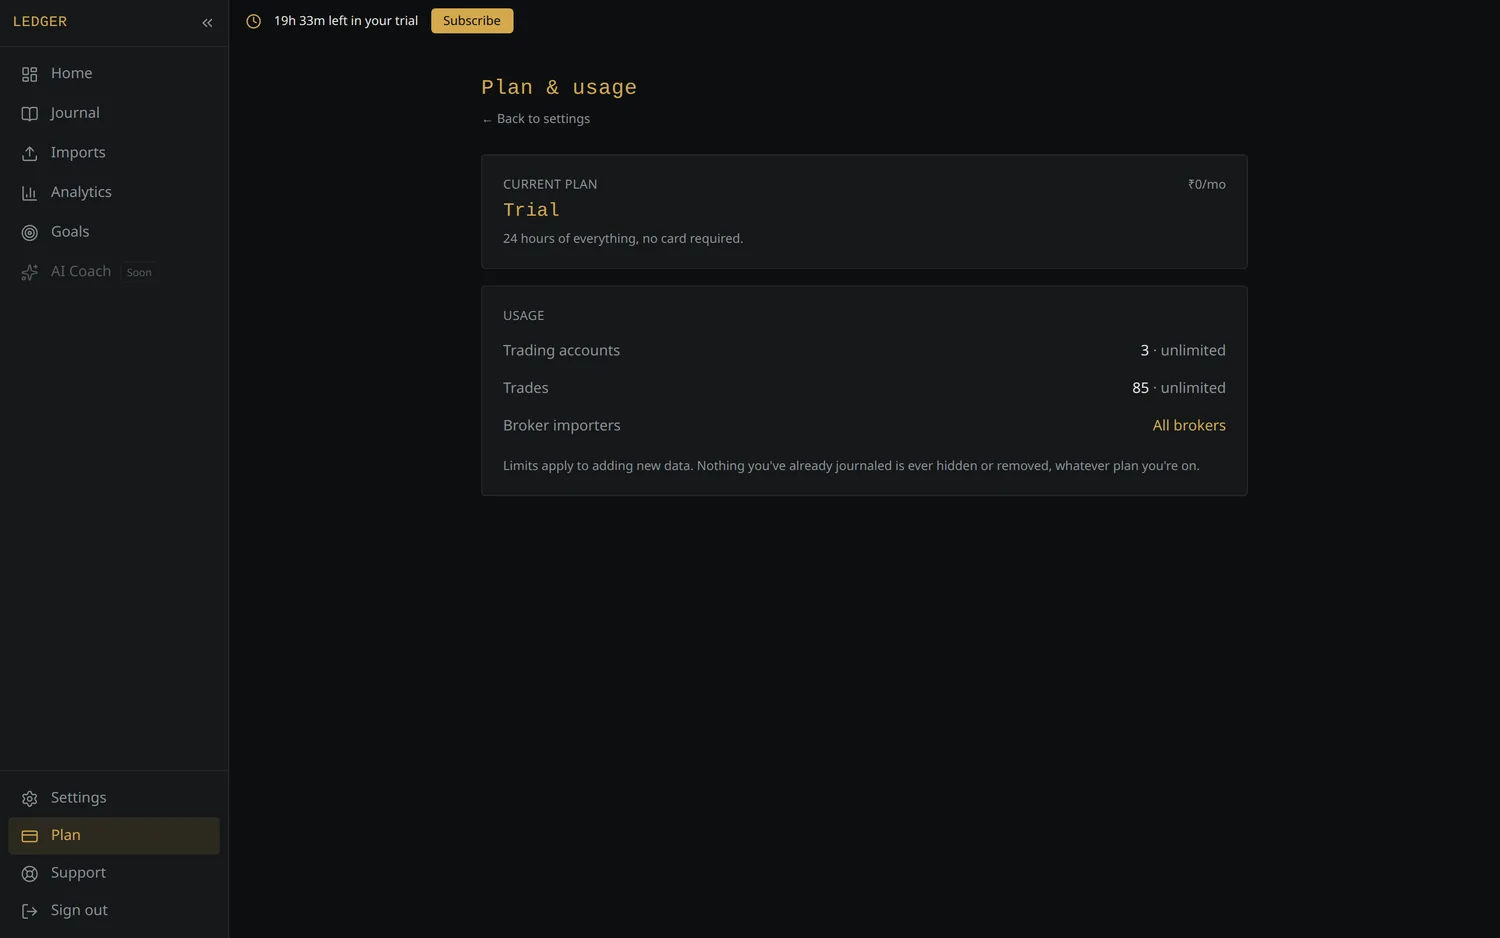
Shows your current plan, your trial countdown or renewal date, and your usage.
Subscribing
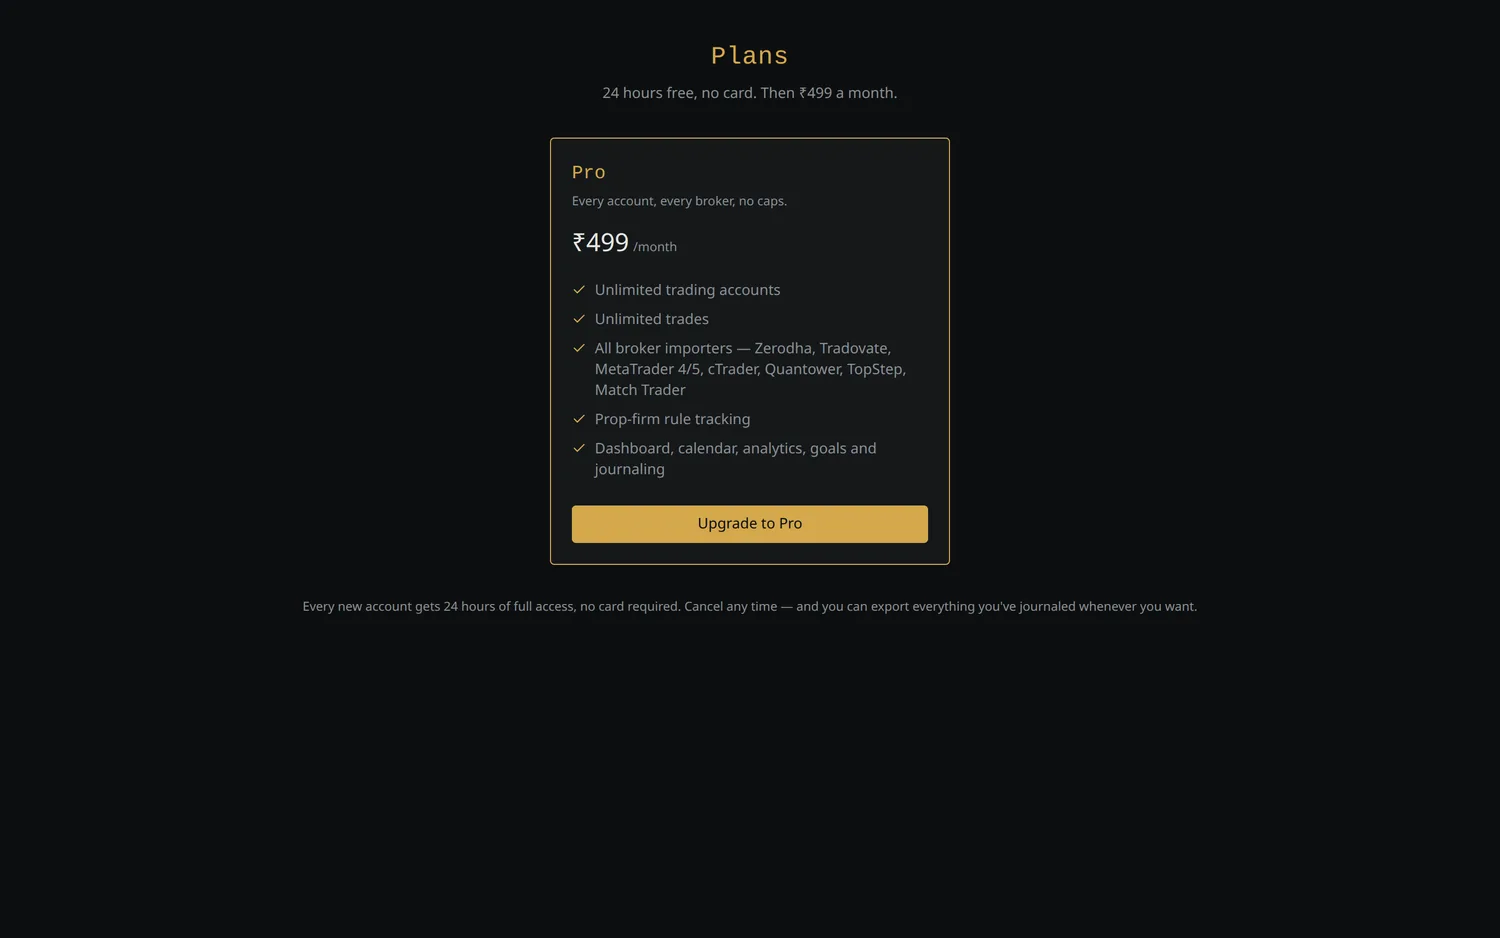
One plan: Pro, ₹699/month. Unlimited accounts, unlimited trades, every broker importer.
Select Subscribe to complete payment through Razorpay. Your plan will update after payment confirmation is received from the payment provider. There may be a short delay between completing payment and your plan status updating while that confirmation is processed. If your plan has not updated after a minute, try refreshing the page.
When the trial ends
If your trial expires before you subscribe, access to the app is temporarily restricted. You will see options to:
- Subscribe
- Export your trades
- Contact support
Your stored data remains unchanged during this period, and access is restored after you subscribe.
12. Support
Support in the sidebar.
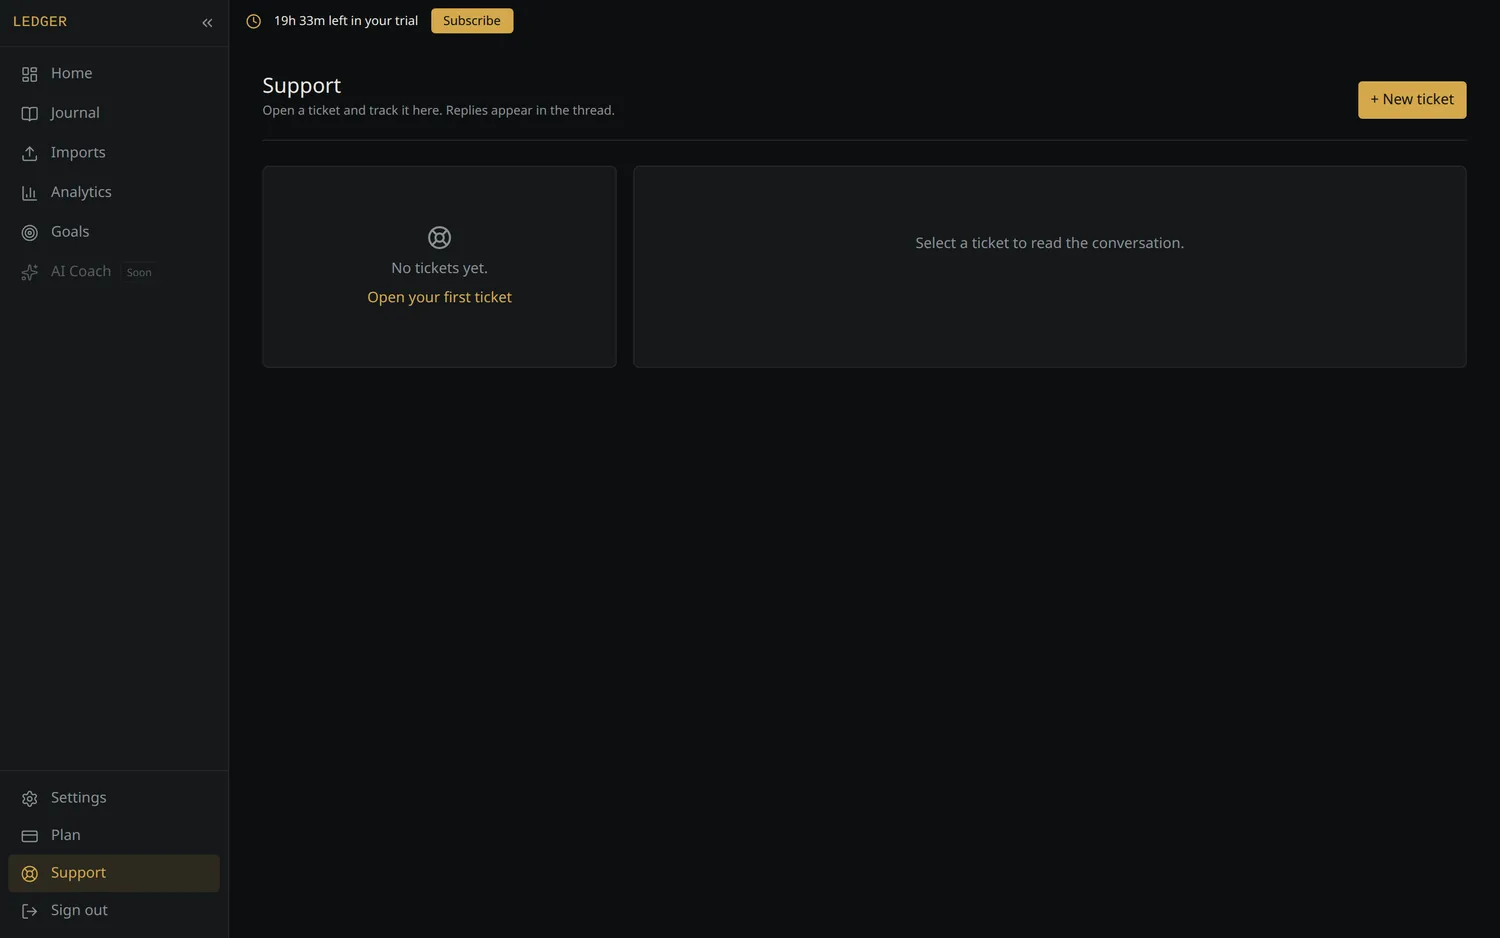
Open a ticket, pick a category, and track replies in the thread. You can mark your own ticket resolved; only support can close one.
Support remains available after your trial ends. If you experience a payment issue, you can still contact support for assistance.
13. Exporting your trades
Your recorded trade data remains available for export during your trial, after your trial ends, and before deleting your account.
Two ways to export:
- Select Export my trades on the locked screen.
- Call the export endpoint directly:
GET /export/trades.csv
The export is provided in CSV format and includes the trade data recorded across your accounts: prices, timestamps, P&L, R-multiples, playbooks, setups, psychology fields and notes.
14. Frequently asked questions
Imports
What happens if there are errors in my CSV? Rows that fail validation are listed individually in the preview, with the reason for each. They don't stop the rest of the file: valid rows still import, and nothing is written until you select confirm.
How are duplicates handled? Duplicates are detected both against trades already recorded in the account and against other rows in the same file. They are shown in the preview, and whether to import them is a choice you make at the confirmation step.
What if my broker isn't listed? Any CSV containing symbol, side, entry price, quantity and entry time can be imported through manual column mapping. You can also open a support ticket under the Imports category with a sample export so we can consider adding it.
Data
Can I recover a trade after deleting it? No. Deleting a trade removes the record. If you want a trade out of your default view but retained, use Archive instead — archived trades stay in the account and remain available.
If I delete a trading account, is it permanently gone? Yes. Deleting a trading account also removes the trades recorded against it, and deleting your user account removes all of your accounts, trades, imports and goals. Neither can be undone, so export your data first.
Plan and billing
How do I subscribe? Open Plan in the sidebar and select Subscribe. Payment is completed through Razorpay, and your plan updates once confirmation is received from the payment provider.
Does the subscription renew automatically? Yes. The Pro plan is a recurring monthly subscription and renews until it is cancelled.
How do I cancel? Cancellation is not currently available inside the app. Open a support ticket under the Billing category and support will process it for you.
What happens to my data if I cancel or my trial ends? Your recorded data is not deleted. Access to the app is restricted until you subscribe, and export remains reachable from the locked screen.